ABOUT BAKING

BAKING BREAD FOR HOME
People who bake artisan sourdough bread aim to get bread with dramatic splits along score lines, and a dark crunchy crust. They prize big air cells in the crumb. So during baking they try for a great 'oven spring'. Their doughs are of high hydration. They advise preheating the oven to high temperatures and often use steam in the first half of their baking, which keeps the crust flexible and facilitates a better rise, the so called oven spring. However they want no steam/moisture for the last half so that the crust can become crunchy.
BAKING PROSPHORO
When we bake prosphoro, we want the opposite! We want as little extra rise to occur in the oven. This is so as to lessen the chance of tearing and splitting the surface. Therefore, we try to more carefully judge the exact apex of the rise before starting to bake. If we humidify our ovens using a tray with boiled water, we use enough water to ensure it lasts till the end of the bake. If we have the luxury of an oven with a steam-added function, we use steam throughout the bake, not just in the first half. Steam keeps the surfaces moist and more flexible and lessens surface splits. It also imparts a lovely shine to the crust.
This discussion assumes you'll be using a domestic, electric oven.
Some useful points:-
It's important to understand how your oven's various settings heat the oven cavity.
1. "Top and bottom" element heating - often labelled "Traditional Baking" is great for baking on one shelf. Few ovens bake perfectly evenly so it is wise to turn the pans occasionally. If you bake prosphora on more than one shelf on this setting, it may result in uneven baking. If you have no choice, rotate the pans several times throughout the bake.
The usual temperatures recommended with this setting are 180 - 190 C.
2. More modern "fan forced" settings use heat from elements surrounding a fan at the rear of the cavity. Some use elements above and below along with the heat from around the fan. These settings offer a more uniform baking throughout the cavity. Hence they claim you can bake on more than one level on this setting. Be aware that you might need to lower the temperature since this setting delivers heat more effectively. Best to set the temperature approximately 20 C lower than with the "traditional baking" setting. It is wise to check on the baking and turn the pans or rotate their positions during the bake to ensure even results.
Remember that for baking prosphoro, we never use baking paper, butter or oil to line the pans. We use natural bee's wax!
Whichever way you bake, we recommend:-
-
You keep an eye on the prosphoro in the first minutes. Watch for large air bubbles under the surface. Promptly pierce these with a fine needle and gently flatten the surface down with a soft brush. Baking in preheated ovens make this happen very abruptly.
-
At about the 30 minute mark, check the colour of the surface. Once it is beginning to blush with colour and become "rosy", cover the pan with aluminium foil for the rest of the bake.
-
It usually takes at least another 40-60 minutes if not longer to bake to completion. So start checking the prosphoro after the first hour. When it is cooked properly, there should be more rosy colouring over the whole surface and when you tip it out of the pan and tap the rear, it should sound very hollow - like a drum.
TROUBLESHOOTING BAKING
(Examples in the images below)
Big bubbles under the surface ruining the impression of the seal
A:- Proper kneading and shaping before stamping, and proper piercing lessens these... but they still happen occasionally. These develop just minutes after your oven begins to heat. As soon as you notice them, pierce the surface before the skin of the prosphoro hardens then tenderly push the skin back down with the tips of a brush's bristles.
Ripping of the surface at the perimeter of the seal
A:- Either your seal has too sharp an edge (very carefully sand it till it becomes more rounded) or you over-moistened the dough surface during the rise. When the grooves of the impression are more wet than the 'hills' then doughs with different hydration levels sit next to each other. During baking, areas of different hydration come apart. Therefore we should aim to have a dough surface of even hydration. Better a little dry and uniform, than wet with water collecting in the grooves.
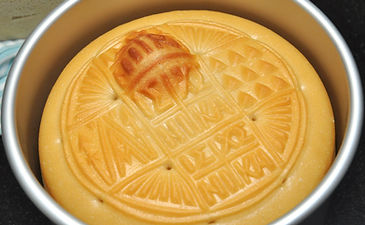
The whole top surface of the prosphoro has risen off the rest.
A:- it is likely your prosphoro had been baked before achieving a full rise.
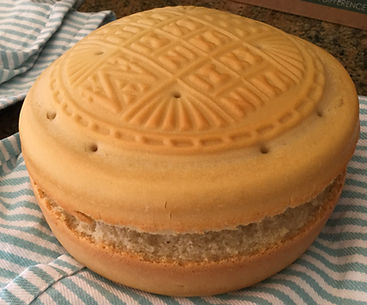
There is tearing and splitting around the sides of the prosphoro.
A:-Again, you might have started baking before the apex of the rise. Or you may not have shaped properly. If you fail to gather the dough edges away from the face of the prosphoro and join them successfully, then a weakness will remain in the side of the dough.
The seal impression area never rose above the surrounding dough surface and with baking, it sank and shrunk even more
A:- Your seal is likely too small for the diameter of the prosphoro. Also it is possible you did not knead and roll the dough enough before shaping and stamping.
The impression was becoming less obvious during the maturation rise and almost vanished during baking
A:- This can arise from a not deep enough impression due to insufficient dough rest before stamping; insufficient maturation before baking; too high a dough hydration.

Torn seal impression
Air bubble near lamb

Tear at edge of seal impression
Torn all round

Under-baked

Over-baked
